


Hello, thanks for tuning in. We’re back with another installment of Exigo Insights! Today, I’m going to cover a topic that I’ve had the pleasure of providing consulting services around for quite a while – Deploying Office 365 ProPlus with System Center Configuration Manager (SCCM).
Now for a quick intro into what this article is meant for:
You’re an IT administrator. You are in the process of migrating to Office 365 and you’ve purchased E3 licenses (or any licenses that cover Office 365 ProPlus) and you are looking to automatically roll out and activate the suite during your migrations. You follow Microsoft’s instructions on how to configure the Config.XML file for the ProPlus unattended installation, and then upon testing, you notice that now you have 2 versions of Office installed. One is the original MSI-based installation that you originally deployed to your organization, and the other, the Click-2-Run (C2R) installation that you just deployed.
Then there’s this scenario. You had an Enterprise Agreement (EA) with Microsoft and had previously deployed the Volume Licensed copy of Office 2016 to your end devices, and upon purchasing Office 365 ProPlus licenses for deployment, you are met with the following error:
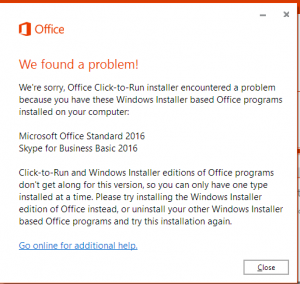
So what happened? You did everything correctly, right? Yes, however, there’s one little detail that Microsoft has left out. MSI-based installations and C2R-based installations do not get along! In order for a successful installation to happen, you would need to remove the MSI-based installation first, reboot, and then install the C2R version.
So how can this be done in such a seamless and efficient way? And furthermore, how can you ensure that you have fully removed any and all MSI-versions of Microsoft Office from client devices before pushing the C2R installation? You could write a long PowerShell script to do so, and maybe throw some verbose logging in there, but what if you’re not comfortable with PowerShell or have the time or resources to do so? What if you are not comfortable with using Group Policy to push the removal and installation of Office, or leaving the chance that the policy never runs fully or is actually pushed to the client device?
Well my friends, I have the answer for you…..SCCM TO THE RESCUE!
But wait, what’s this black-magic you speak of? Well my friend, I have you covered there as well. SCCM, since 1602 was released, now has built in Office 365 client management. Furthermore, even if you do not have 1602 implemented at this time, you can still create an installation package for Office 365 ProPlus for deployment. This, along with using the OffSrub VBS files from the Microsoft FixIt utilities for removing versions of Microsoft Office, can be used to create an automated Task Sequence in SCCM that can do the following:
I have used this method for numerous clients with 100% success and now, I would like to pass this method along to you!
Before you begin, please make sure you obtain the following:
https://drive.google.com/open?id=11_hq7Y5sNx5bVYPYwKSi22co_l-GMlQL
https://www.microsoft.com/en-us/download/details.aspx?id=49030
Before you being making the deployment package, you will need to customize the Office 365 C2R installation, and obtain the installation files. To get started, follow the instructions below:
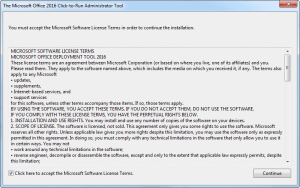
Step 1 – Once you have downloaded the Office 2016 Deployment Toolkit, run the executable and extract the files to a folder that can contain all of the downloaded files. Note: Typically, it would be best to extract this to the Source folder share on the SCCM Distribution Point server.
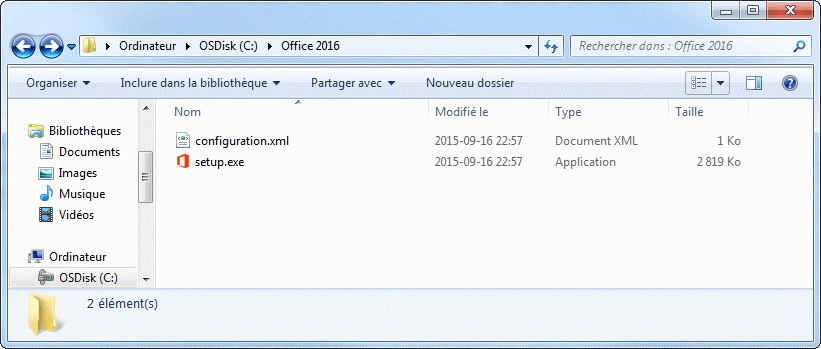
Step 2 – After you run the executable, you should now have 2 files in the folder, setup.exe and configuration.xml.
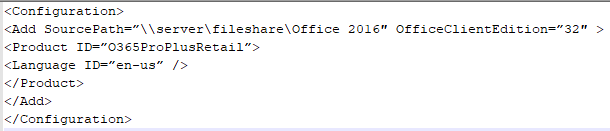
Step 3 – Now, make a file in the folder that you extracted setup.exe and configuration.xml to called Download.xml. Once you have created this file, copy and paste the contents below into the folder. Make sure that you edit the SourcePath to represent the UNC path where you extracted the Deployment Toolkit to, and that your OfficeClientEdition is set to the architecture you wish to deploy (32 for 32-bit or 64 for 64-bit).
Step 4 – Next, modify the Configuration.xml to reflect this. Make sure that you edit the OfficeClientEdition to reflect the architecture you are deploying to, and to specify the location you want to log the Office Deployment to in the Logging Level section.
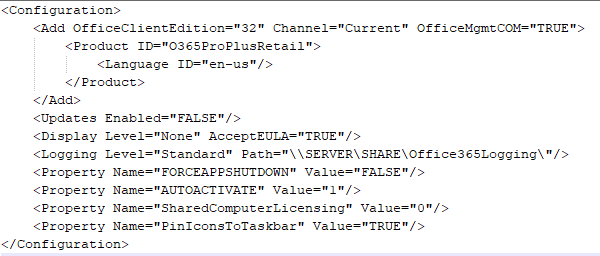
It’s important that you don’t include the SourcePath attribute in the Add section of your Configuration.xml file. That’s because SCCM copies the installation files for an application into a folder under the SCCM client cache folder, and the name of that subfolder is different for each computer. The DisplayLevel and AcceptEULA parameters ensure that our installation is silent.
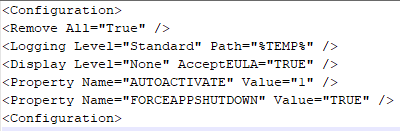
Step 5 – Next, create a file in the setup directory called Uninstall.xml. Modify the file with the text found below.
Step 6 – Once the 2 files are created, we can launch the download using our Download.xml file:
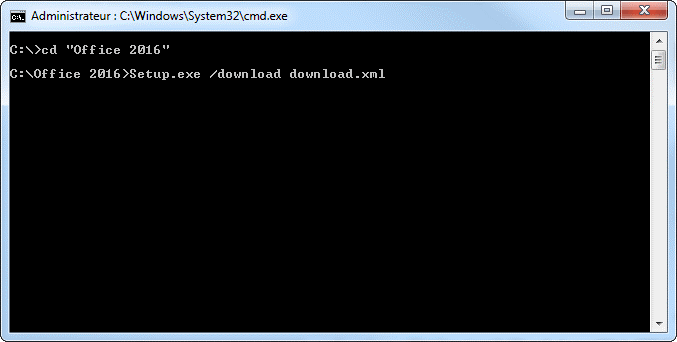
The download starts silently; you’ll see an Office folder appear in your Office 2016 directory. The folder is 1.25GB so it will take some time to complete depending of your download speed. You won’t have a notification when it completes.
If the directory was created outside your SCCM source directory, move it to its definitive location before creating the application
Also, at this time, you should extract the Removal Scripts into the Setup Folder. These will be needed for later. Create a folder called Removal Scripts and extract the 3 removal scripts to that folder.
Now it’s time to create the Office 365 Application for deployment. Let’s get started:
Step 1 – Open the SCCM console.
Step 2 – Go to Software Library / Application Management / Applications
Step 3 – Right-click Applications and choose Create Application
Step 4 – On the General tab of the Create Application Wizard, select Manually specify the application information, choose Next.
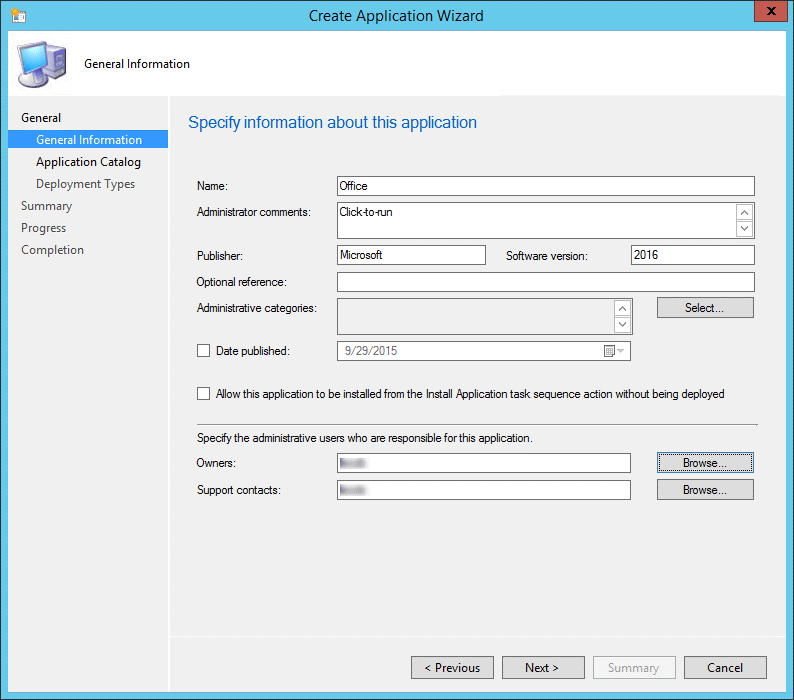
Step 5 – On the General information tab, enter a name for the application, enter any optional information, choose Next.
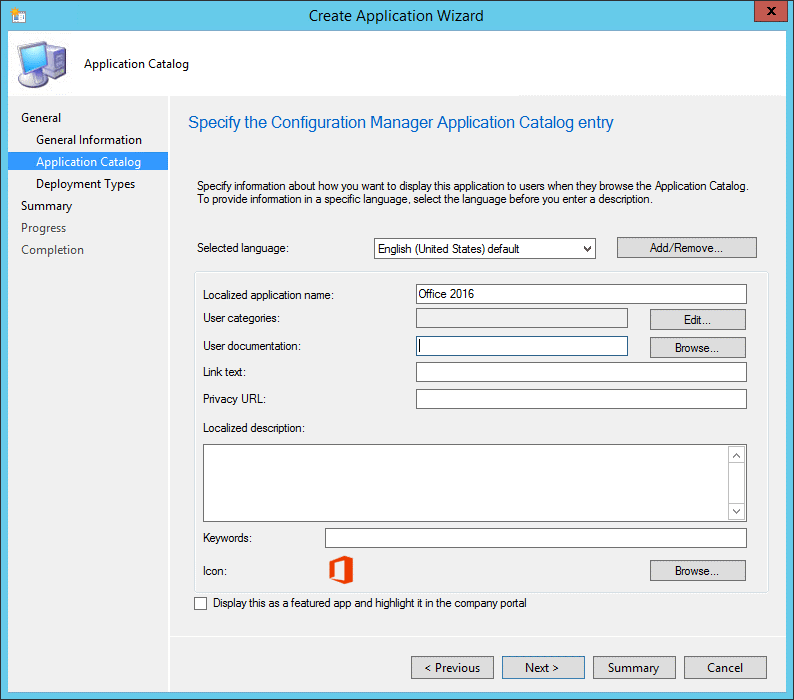
Step 6 – On the Application Catalog tab, provide the information that’s appropriate for your environment. Choose Next.
Step 7 – On the Deployment Types tab, choose Next. We’ll add a Deployment Type in the next section.
Step 8 – On the Summary tab, review the settings you’ve chosen, then choose Next.
Step 9 – Complete the wizard by selecting Close.
In the last section, we skipped created the Deployment type. This was so we could come back and expand a little further on it in this section. For a quick overview, the Deployment Type is where the setup information and conditions for the SCCM Application is specified.
To edit the Deployment Type for the Application we just created, let’s do the following:
Step 1 – Open the SCCM Console
Step 2 – Go to Software Library / Application Management / Applications.
Step 3 – Right-click on the Office application you created, and choose the option for Create Deployment Type.
Step 4 – On the General tab of the Create Deployment Type Wizard, in the Type list, select Script Installer, then click Next.
Step 5 -On the Content tab, do the following:
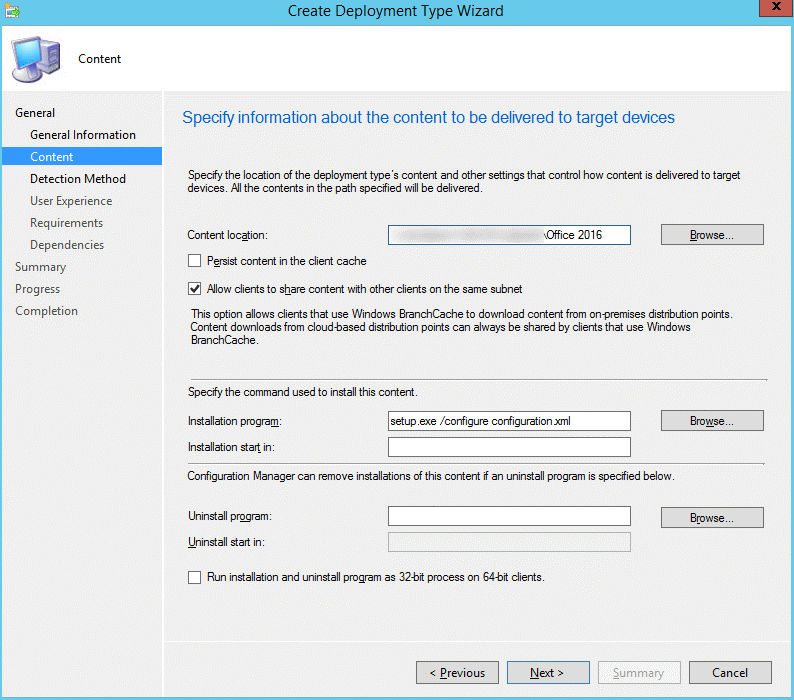
Step 7 – After you enter this information, click Next.
Step 8 – On the Detection Method tab, choose Add Clause.
Step 9 -In the Detection Rule dialog box, do the following:

Step 10 – After you enter this information, choose OK, then click Next.
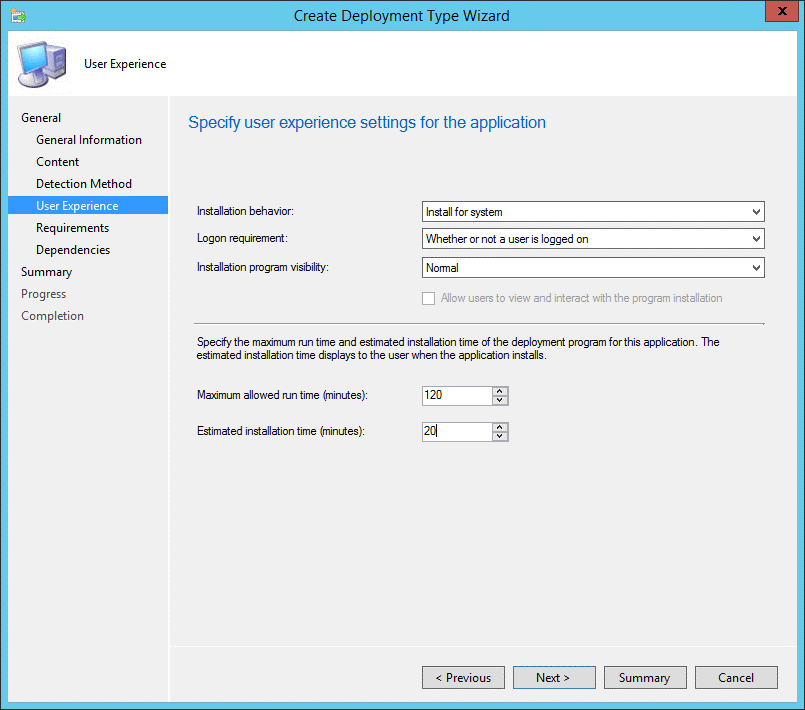
Step 11 – On the User Experience page, in the Installation Behavior list, select install for System, then click Next
Step 12 – If you want to specify any requirements or dependencies for the deployment type, chooseNext to go through those pages in the wizard. Otherwise, choose Summary.
Step 13 – Complete the wizard by selecting Close.
The only step left is to distribute the content to your distribution points and create the deployment.
Phew, this is a lot, but thanks for making it this far. It’s now time to put it all together into the deployable automated Task Sequence. Let’s get started:
Step 1 – Open the SCCM Console
Step 2 – Navigate to Software > Operating Systems > Task Sequences
Step 3 – In the SCCM Console Ribbon, chose the option for Create New Task Sequence.
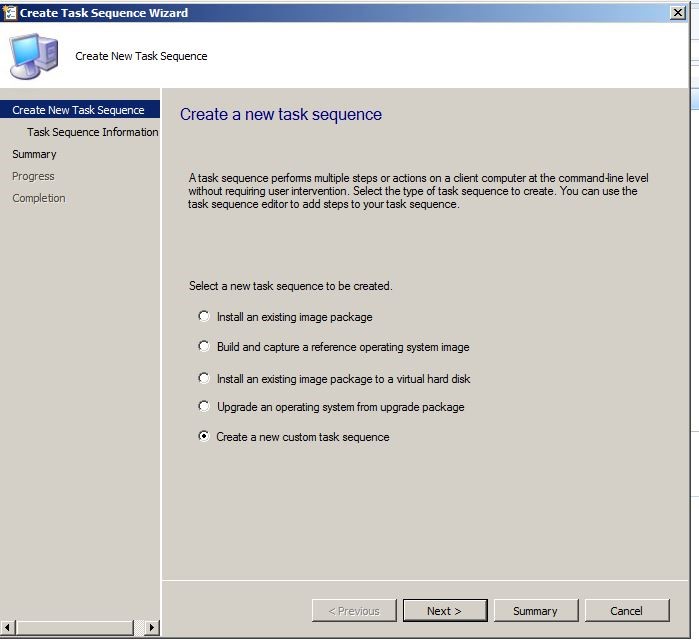
Step 4 – The Create Task Sequence Wizard will appear. On the first page, choose the last option to Create a new Custom task sequence. Click Next to continue.
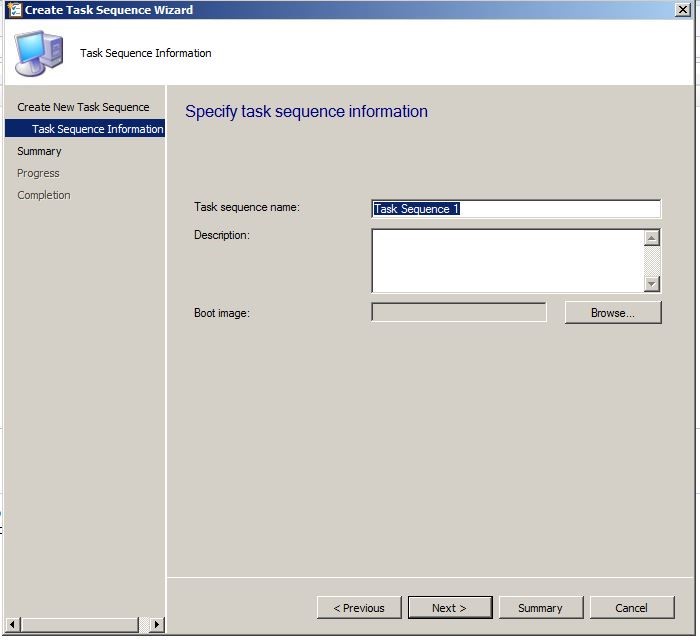
Step 5 – On the Specify Task Sequence Information section, enter a name for the task sequence and click next. From here, you can click Next until you complete the wizard.
Step 6 – After you have completed the wizard, you should now see your newly created task sequence in the SCCM console. Right Click on the task sequence and click Edit.
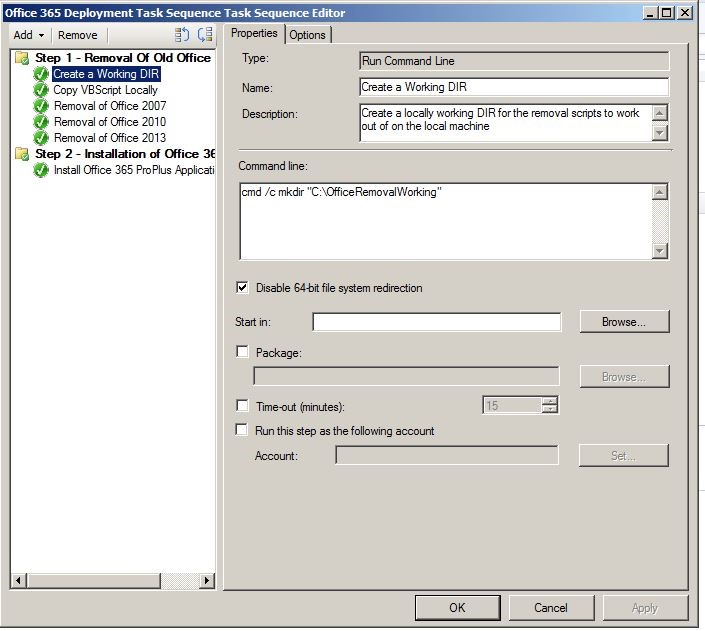
Step 7 – The Task sequence editor should now be open. The first thing we want to do is add a group for the removal of Office process. Click on the Add drop down menu and choose New Group. Name that group Step 1 – Removal of Old Office (or whatever you would like).
Step 8 – Next, click add and choose General > Run Command Line. This step will create a local working directory on the machines you are deploying to. Enter the parameters shown in the image below:
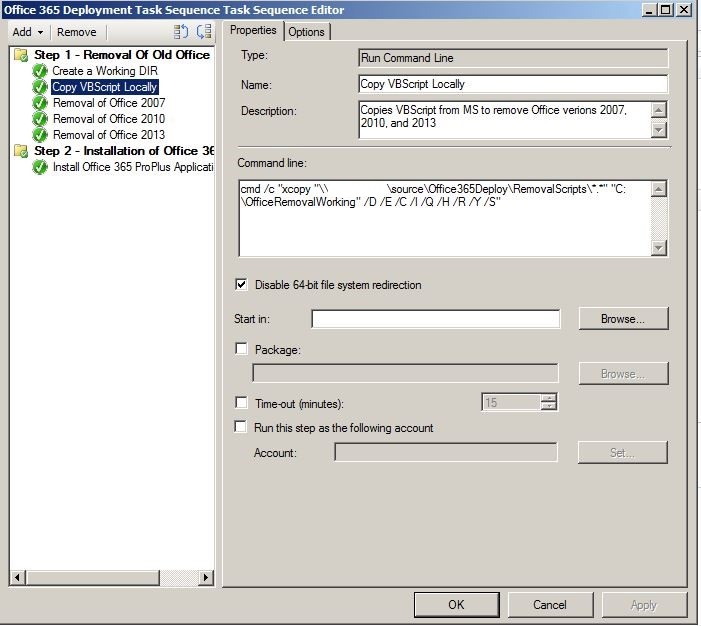
Step 9 – Next, repeat the same process as in step 8. This step will copy the removal scripts from the source directory to the local machine. Make know, you’ll have to change the UNC path to match your environment.
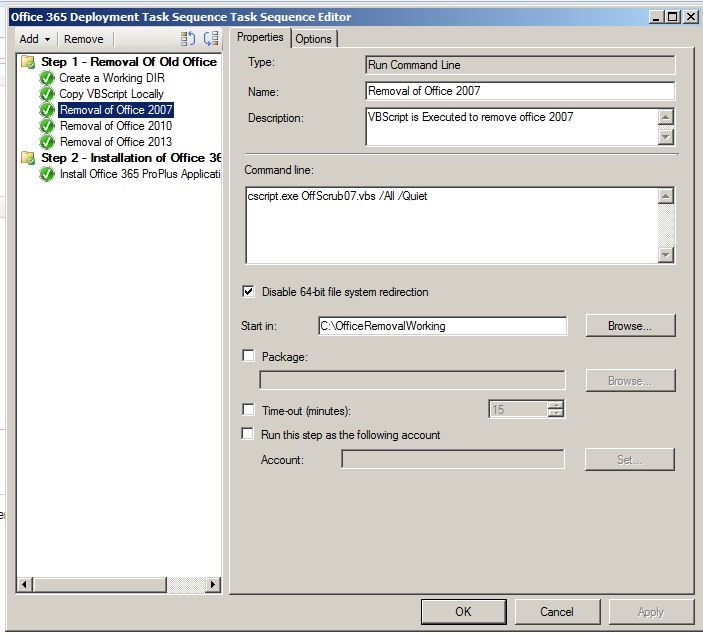
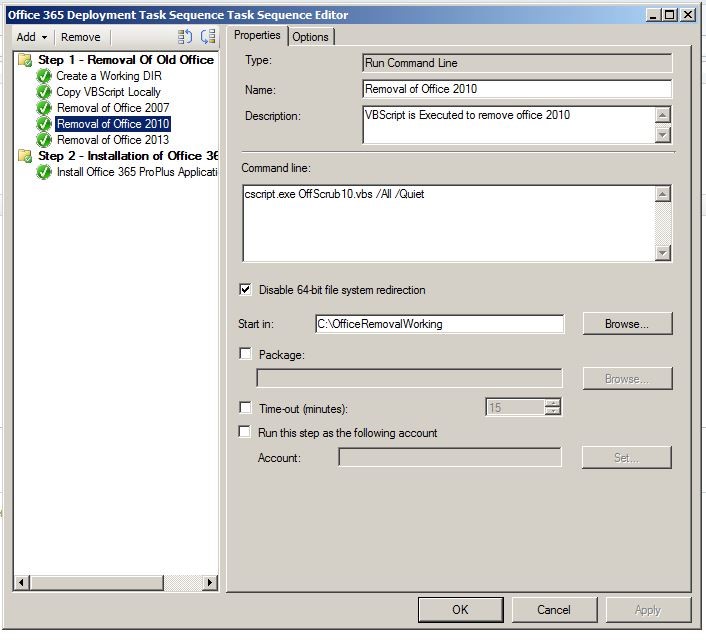
Step 10 – Next, repeat the same process again 3 more times, using the following images in order. These steps execute each script and remove each version of Office specified:
Office 2007
Office 2010
Office 2013
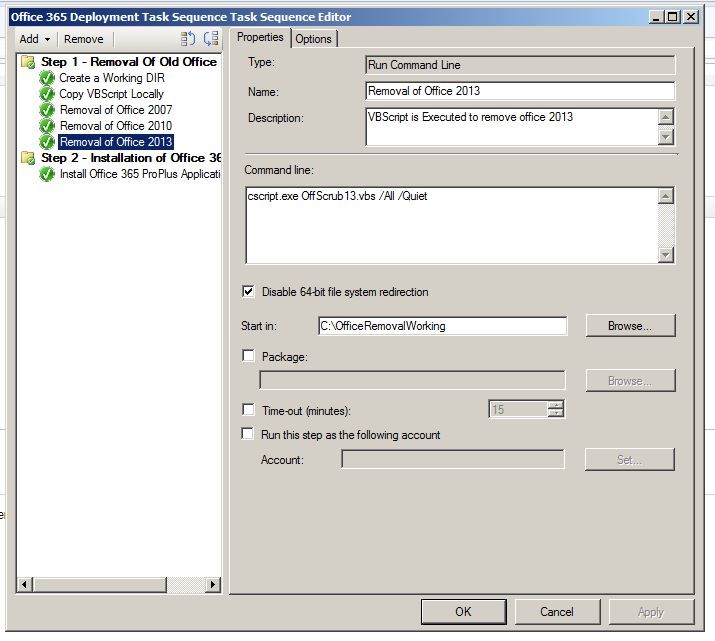
Note: Office 2016 is not shown, but it’s the same process for that OffScrub file as well.
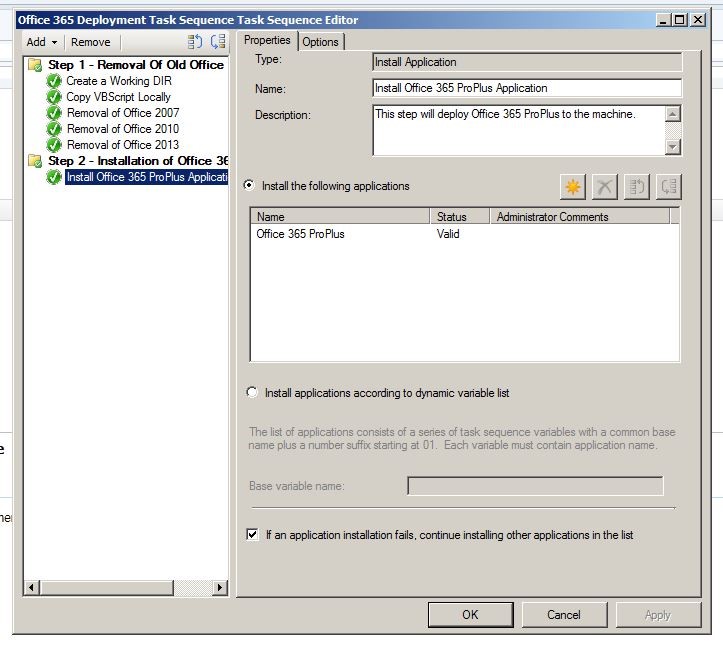
Step 11 – Next, click on the Add drop down menu and choose New Group. Name that group Step 2– Installation of Office 365(or whatever you would like).
Step 12 – Next, click on Add, then choose General > Install Application. In this step, you will choose the Office 365 ProPlus application you created earlier. Observe the image below, add your application, and then click Ok to close out the wizard.
Only one thing left to do before you deploy the task sequence. When you deploy the C2R install, you’ll want to make sure that your users are automatically activated based on their federated account information (if using ADFS or Pass-Through authentication) and are not prompted with any authentication boxes. This will be done with a GPO in the next section.
After you download the ADMX templates for Office 2016, you’ll want to create a group policy to apply to the users you wish to deploy to that will AutoActivate them with their federated credentials. This only applies if you have ADFS or Pass-Through authentication deployed for Office 365 SSO.
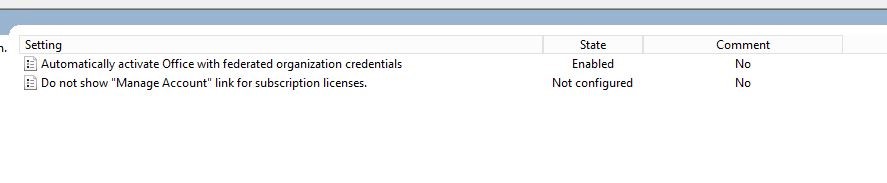
Once you have the policy definitions imported to a domain controller, you will create a new Group Policy, and under User Configuration > Administrative Templated, Microsoft Office 2016 > Subscription Activation you’ll enable the option for Automatically Activate Office with federated organization credentials.
Assign the GPO to the Organization Units (OU) that apply, and you are ready to deploy the task sequence.
After following the previous steps, you are ready to deploy the task sequence to the machines that will require the office upgrade. It would be recommended that you test the deployment out first before going live with it. With SCCM, you can either target User Collections (which would target devices that users log into) or you can target Computer Collections (which would target specific devices). Personally, I would use Computer Collections for this to ensure that you are target devices that you would like to target.
Well folks, that about wraps it up for another episode for Exigo Insights. Thanks for sticking with me, this was a doozie. Stay tuned for more as I continue to review new and exciting technologies and methodologies for implementation!


